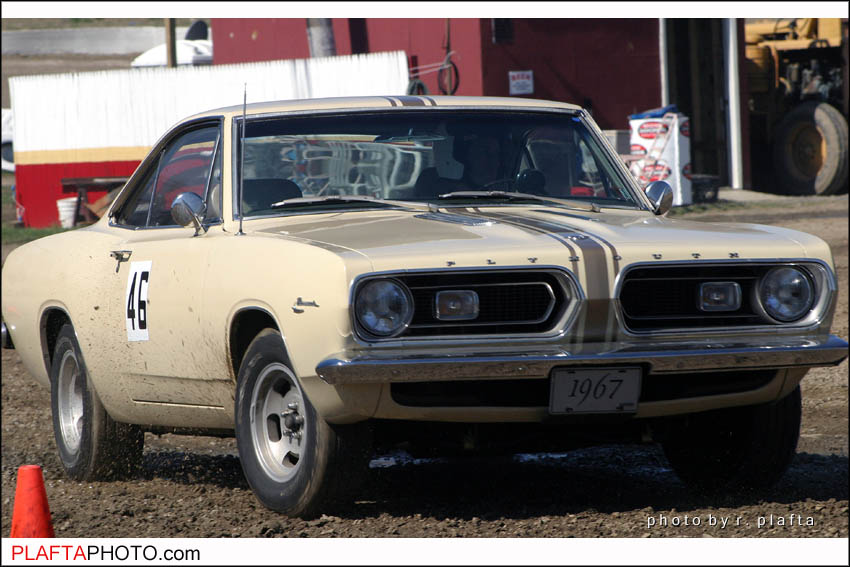
courtesy of www.plaftaphto.com
What's it Got ?
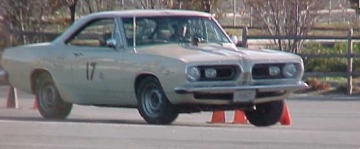
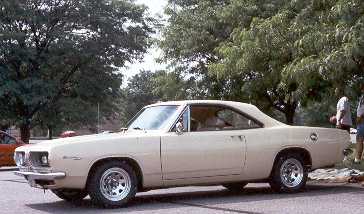
A '67 Barracuda Set-Up for Autocross & Ralley:

courtesy of www.plaftaphto.com
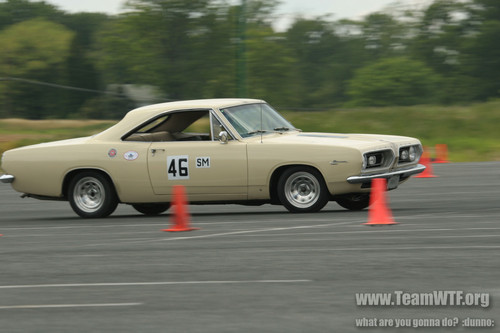
Intro: '67 Barracuda..one
curve to another
More Tech: Lighting &
Electricals Ignition
Wires Distributor
Fuel Strut-rods Mopar Roll Rate & Balance.
|
courtesy of www.plaftaphto.com |
What's it Got ?A '67 Barracuda Set-Up for Autocross & Ralley: |
courtesy of www.plaftaphto.com |
The key to any build is choosing components that work well together. There are two approaches to to take. One, copy what someone else has successfully done. The second method is to understand what ought to work together and try to put together your own package. And nowadays there's a third approach which didn't exist a few years ago, buy parts.that are marketed with a promise and hope for the best. To do that successfully, one of the first two approaches is needed.
| SUMMARY 1. SUSPENSION - Springs & Shocks 2. BRAKES 3. STEERING 4. WHEELS - Rims & Tires 5. POWER TRAIN - Intake to Axle 6. ELECTRICAL |
 |
Springs:
Spring rates were chosen with the objectives that they be soft
enough for use on rough roads, and that a rear sway bar would not
be needed. Why no rear bar? Two reasons. The first was that a good
rear bar was not available at the time. The second was that many
road racers have found that the rear bar makes the car too
twitchy. However, autocrossers might benefit from having a good
adjustable bar. It is likely that the next change in rear springs
may be accompanied by a rear sway bar. Availability is getting
better again. Firmfeel and a few
others are now making them. Unlike some aftermarket ones
made in the 1980s-90s, Firmfeel's are indexed.
It is important to keep the balance between the front and rear springs. The handling line discovered emperically by Direct Connection (Chrysler) is a useful tool once you grasp it. The main difficulty in calculating the roll rates is in getting the spring rates for the sway bars and the leaf springs.
For a long time the car was set up with 1.04" torsion bars ( about 200 lbs./in. wheel rate), a 1.125" diameter front anti-sway bar, and 6 leaf 'heavy duty' rear springs made by Triangle Spring (160#/in). Result was as follows. The leaf springs were a little too stiff and had a little too much arch when new. Over time, the rear spring rates went down and the front/rear balance got better. However, after 80,000 hard miles, the right rear spring was worn out.
The new set up is with 1.09" Mopar Percomance torsion bars,
1.125" diameter sway bar, and Landrum asphalt track springs (200
#/in). The Landrum springs are on the crude side and
we had to send one back to get a matching set. Also the
second leaf does not come as far up and under the front eye to
give good support. The main leaf is nice and thick. (The
Direct Connection Chassis book recommends minimum main leaf
thickness.) Overall, I am very pleased with the car's balance. At
autocross speeds and in the dirt, very controllable throttle
oversteer an be fed in. With the earlier set up, wheel hop
was controlled mostly with the pinion snubber. Our goal was not to
use that method anymore as it compromises some of the cornering
dynamics. Raising the front spring eye reduced the hop and lowered
the car for autocross. For rough roads, stock spring eye
location has provided the needed ground clearance and suspension
travel. Handling on solid pavement is still plenty good
Front Sway Bar Linkage and SPAX Shocks:
WARNINGS about Swaybars.
Chrysler only put sway-bar tabs on cars that came with sway
bars. Mine were welded on afterwords, but tabbed lower arms
can still be found. Note that there were several changes made in
K-frame and sway bar designs over the years. If you fabricate
you're own, position them in stock locations or check the linkage
geometry with the control arms in full compression.
Rear sway bars can easily cause oversteer if not balanced
by much increased front roll rate or shifting of
weight. Add front anti-sway bar and or increase front
torsion bars first! Oversteer (fishtail and spin) may only
show up on the street in the worst situations such as high speed
turn on slick surface.
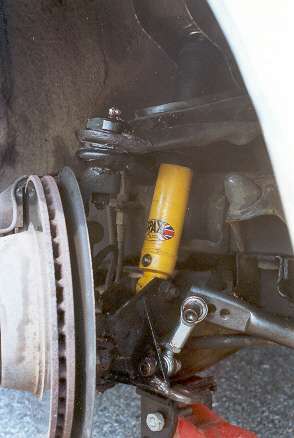
Shocks:
I've installed the SPAX shocks. They are
relatively cheap (for adjustables) and have proven to be far
better than the KYBs on the street in terms of ride quality and
provide similar if not better control. However, the SPAX
shocks are designed for Australian valiants and need some minor
mods to fit the US & UK A-bodies. Front shocks need the
bushing sleeve opened up very slightly with a drill or
reamer. SPAX ran out of bushings for the rear shocks,
so you need to install your own bushings now. Model numbers
for the SPAX shocks are G480 & G481.
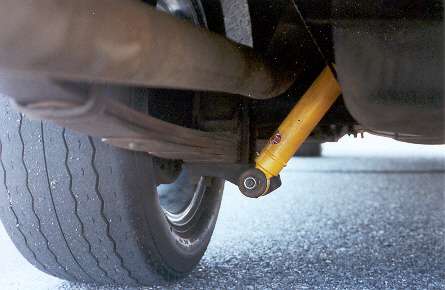
For the rear shock bushings, I used
polyurathane Chrysler 5/8" Shock Bushing (Energy Suspension
#9-8112G). Apparently the 11/16" inner diameter is not
available. However all of the other dimensions are correct,
so its "just" a matter of drilling out the center. Although
easier than drilling rubber, the bit still wants to tear rather
than cut the soft material. Freezing helps make it
stiffer. After drilling, I cut the bushings in half with an
Xacto razor saw and a sharp utility knife. By making two
halves, the bushing does not need to pressed in.
SPAX Features: The SPAX shock is single
adjustable, but each click effects the compression only about 1/3
as much as the extension motion. This is good.
Adjustment is also external. Price is about $80 to $100 each
(US).
Credit for discovering this application of the Aussie Valiant
shock goes to Dave Mapes
who tried them out on his '66.
The KYB Gas-a-justs were a cheap non-adjustable
shock. I hear bad things about the ones made in recent
years, but I had one leak after about 6 years and it was
replaced for free. In the past two to three years (as of
2016) both Bilstein, Edelbrock, and others now offer performance
oriented shocks for the 1960s-70s mopars. No personal
experience with them, but they are worth looking into. Tim
Werner effectively used a Bilstein combo he made for his high
speed track car (Project Valiant). Shocks are very important
for both vibration (high frequency) and roll control through
curves (low frequency), so most serious competitors look for dual
adjustable shocks to tweak the most out of the car.
Front Suspension Alignment and Bushings:
Caster and Camber
is adjusted by cams on the upper control arm. Moog adjustment
cam kit comes with longer bolt heads than stock. Offset
bushing kit sold as "problem solver" will get more caster or
negative camber.
Alignment is very important for
both how well the car tracks and how will the tires grip when accelerating, turning and
braking. Here is one place where the factory specifications may not be the
best. First, tire construction and
materials have
changed, generally for the better, but generally
also requiring more camber. Second, many roads at the time had a high crown and the
factory had to consider that. Finally
they had to make sure that 99.5% of their customers could
turn the steering wheel. With these considerations, more positive caster,
and more negative camber with factory toe generally works
well. When using competition tires, check with the tire
manufacturer for the recommended camber.
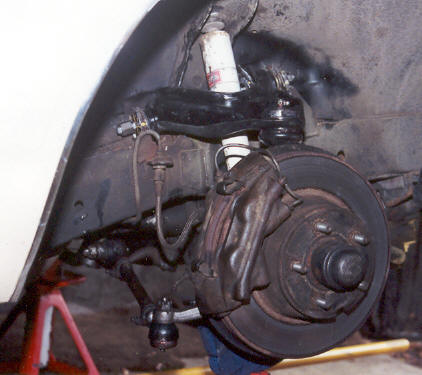
Kelsey-Hayes 4 piston calipers work
very well, but with a car that sits alot, brakes need to be bled
every year to remove moisture and rust. Dry brake fluid is
also critical for good pedal and to reduce the chance of boiling
with repeated high speed stops. The Valvoline DOT3/4 seems to stay
cleaner than the Castrol LMA. .
The power booster was not liked by me and was sold, along with the
stock proportioning valve. (Stock - but not from this car
-it was an all drum brake car originally).
Parts availability for the brakes seem to run in cycles.
Usually Kelsey Hayes calipers are readily available as they are
very similar to the versions used on Mustangs and some
Corvettes. Rotors are sometimes hard to find, and some of
the aftermarket ones are not very good. For example several
years back the Bendix were not balanced and the "hat" section
tapped the caliper piston boots every rotation. I returned
them! Drums were unavailable for awhile but now can be
bought from any parts store.
Chrysler made running changes to the drum mechanism, adjusters
and shoes from 1967 through 1969. These are documented in
the TSBs and MTSC booklets. In 2015 I switched to the 1969 style
adjusters and shoe frames.
For linings, I am currently (2016) using Porterfield's
R4S on all both pads and shoes. All of the previous linings
I used are no longer available. The reasons for trying the
R4S are:
Portefield will arc the shoes to match the drums; As a
multi-use car, a low temperature street lining was needed for most
situations; They should hold up for first time track use and
will be compatible with R4 if/when high temperature track linings
are needed. For mass marketed linings, one can
usually check the friction codes on the sides to get a relative
idea of their high and low temperature perfmance (street use)..
Original K-frame:
The '67 A-body has a weak idler arm. I
should have swapped the K-frame when everything was
out! Every 2 or 3 years the idler arm wears
out. The '67 idler hangs down from a stud (same design
as the earlier A-body idlers, but the idler for '67 is a one year
only part). In 1968 Chrysler changed the design to a through
bolt. Lesson. Don't autocross or rally with the '67 design
if you can help it! The car finally got a '68 K-frame in
2003.
Steering Gear:
A manual steering box with the p-part 20:1
ratio worm gear was used for quite a while. This is a
relatively streetable ratio depending on - how much parallel
parking, how big and heavy the wheels are, and what the scrub
radious is. Once you are moving its fine. However,
this ratio is a little too slow for the slaloms.
In 2003, a 16:1 steering box was installed. It requires
significantly more effort to parallel park the car. A big
stock diameter steering wheel helps with leverage although some
find it 'slow' to turn when racing.
Why manual steering? There is weight savings using the aluminum manual box over a power unit. In addition, the stock power steering units lacked road feel. However two companies sell firm feel power steering boxes which overcome this problem.. Some who have used power steering in competition report the need for a cooler.
WHEELS
This car is using the original 5 lug - 4 inch
diameter bolt pattern. For the record, by 1968 some of the race
prepared cars had a 4.5" bolt patterns, either creeated with
various combinations of parts pulled from the bigger cars or using
a limited run of disks and hubs. Many people today switch to
larger pattern by changing spindles, front brakes and rear
axles. I haven't.
Rims: A fairly limited offering of wheels is available for the small bolt pattern. The factory only offered steel 13 and 14" rims for the small bolt pattern except for the 1969 Kelsey Hayes option.. The widest width was 5.5" which was OK for the E70-14 tire size which isroughly the same dimensions as a 205/70-14. Advantages of staying close to stock tire and wheel diameter include lower weight and lower ride hieght compared to larger and taller rims and tires. In addition, the option of using tall sidewalls provides a means to drive on really bad roads with one set of tires and switch to a lower profile for competion. Disadvantages are a currently somewhat limited offerings in performance street tires for 14 and 15" rims.
Wheel Options for aftermarket 5 on 4" bolt pattern rims.
(Look around, More are now available, 2016)
1 - Centerlines. Two reasonably priced rims styles, but one is
really for drag racing only(no air vents to help cool the brakes).
2 - Crager SS. Look nice, but are at least as heavy as stock
rims. Available both new and used.
3 - Ansen Slots (and copycats). Cast aluminum rims which are
fairly common and strong. These are what I use now. They are
fairly light and strong, and came in 14x6, 14 x7 and maybe other
sizes. American Racing Equipment now makes a new version in 14 and
15 inch diameters.
Watch the front fender when running 215/70 tires on the 14x7 with
the front lowered. The backspace isn't quite deep enough, and they
sometimes touch. The shouldered lug nuts are a pain to install on
stock length studs. 14x6 cast slots about 12 lbs. 14x7
cast slots about 14 lbs.
3b - You might also find other style used rims such as
torque-thrusts, or the recalled Kelsey Hayes. The latter
actually being a relatively sought after piece (unlike most small
bolt pattern rims) will usually have a very high asking price.
4 - Custom Steel. Several companies will put a small pattern
centers into ralley style or stock style 14" and 15" diameter
steel rims. I did this for my first set of autocross
rims, 15x7 ralleys, about 19 lbs. each. Relatively cheap.
5. Custom Aluminum. That's what I was using for autocross.
Circle Racing (now Spinwerks) makes a spun rim. Whether they would
do well for street and ralley use I do not know, but are certainly
fine for autocross and track days. They do flex under load, always
a problem as rims get lighter. For more money there are
Bogart rims (also aluminum, but a stiffer construction). 13
lbs. each. for 15 x 7.0" Circle rims. A lug nut with
larger outside dimensions is a help. A fellow on e-bay is now
offering 17" rims with a vintage SS look. I don't know anything
else about them.
With the 15" diameter spun aluminum or steel rims,
4.4" back space is about the limit before hitting the upper
balljoint. Going to 16" rims would probably clear the
balljoint. A 7" width is just a bit too small to carry
a 245/45-15 tire decently. There appears to be room to go
outward to 7.5 or 8", but this will also move the centerline out.
This will increase front track. In general this is a good thing,
but it also increases the scrub radius, which especially with a
manual steering car, is a bad thing. Stock offset was about
0.7", and 7.5" rim with 4.4" backspace is about 0.2" and with an
8" rim would be about 0.75" away from stock.
 Fall 2001. BFG R1 245/50r15 tires on 15 x 7 Ralley Rims (photo courtesy of Steve Claymen) |
 June 2002 Hoosier TDs on 15x7.5 Circle Racing Aluminum Rims |
Tires:
The tallest tire I've run (to gain ground
clearance for the headers) were 225/70r14 BFG Radial T/As.
These tires easily fit, but under extreme conditions (full
jounce-turned hard), the fronts just touched the fender
trim. After removing the Headers by Ed, the 215/70-14s which
serve fine. This size has also worked fine with the
new custom headers which have great ground clearance.
Firestone's Firehawk Indy 500 have better traction than BFG's
Radial T/As on both pavement and loose surface but are not
currently available.
Now to seriously autocross, the street
tires don't cut it. Sticky tires are more fun and save the
street tires for what they are better at doing. In my
opinion, 225/50r15 are not wide enough to make the car truly
competitive in Solo 2 autocross competition, but its a fairly
available size and keeps the ride height low, while happily
fitting on 7" wide rims.
In 2001 I squeezed 245/50-15 BFG Comp T/A R1s
onto a set of 15x7 'ralley' rims. This made the shoulders
round and not all of the tire could be used
effectively. Steve Wall had this size tire rub on his car
during manuevering (see link to autoxcuda). I ran a little
less backspace on my rims (4 3/8") and had only a little rub on
the rear leaf springs and on the front sway bar and none on the
sheet metal.
After deciding I liked the 245/50s, BFG
basically got out of the market. This left Hoosier the only
manufacturer of 245/45-15 competition tires. (well Avon did
also, but...anyway) I went with the Hoosier 'Street
TD' bias ply and what I thought were 15 x 7.5" aluminum
rims. It turned out the rims were only 7.0 inches
wide. Oops! Also, while the Street TD very hard to break
loose, it provided less directional feel than the
radials. Fast forward to 2006. In a back to back
test, Dave Mapes and I found the 5 year old TDs were still
fun, but significantly slower for autocross than a somewhat old
set of 225/50r15 Toyo RA1s. Guess what tire I'm running now.
Wheel & Tire Weight Comparison:
( mostly weighed on a bathroom scale )
| Rim |
Rim Size |
Rim Wt | Tire |
Tire Size |
Tire Wt |
Total |
| Stock '67 Steel |
14 x 4.5 JJ | 15 lbs | ||||
| Cast Aluminum slot 14 x 6 | 14 x 6 |
13.5 lbs | Firestone Indy 500 | 215/70r-14 | 24 lbs | 37.5 lbs |
| Cast Aluminum slot 14 x 7 | 14 x 7 |
14.5 lbs | BFG Radial T/A | 215/70r-14 | 24 lbs. | 38.5 lbs |
| Steel "ralley" rims, | 15 x 7" | 19 lbs. | BFG Comp T/A R1 | 245/50R-15 | 26 lbs. |
45 lbs |
| Circle Racing spun alum. rims | 15 x 7.0" | 13 lbs | Hoosier T.D | 245/45D-15 | 17 lbs. | 30 lbs |
| Circle Racing spun alum.
rims |
15 x 7.0" |
13 lbs |
Toyo Proxes RA-1 | 225/50r-15 | 21 lbs. | 34 lbs. |
| ARE Ansen Slots |
15 x 7.0" |
16 lbs |
Toyo Proxes RA-1 | 225/50r-15 | 21 lbs. | 38 lbs. |
 |
 |
 |
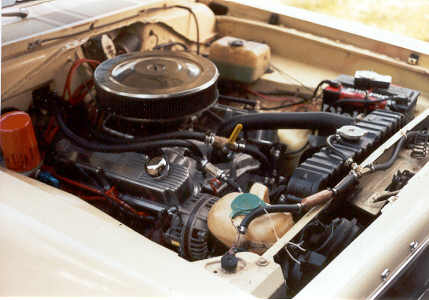
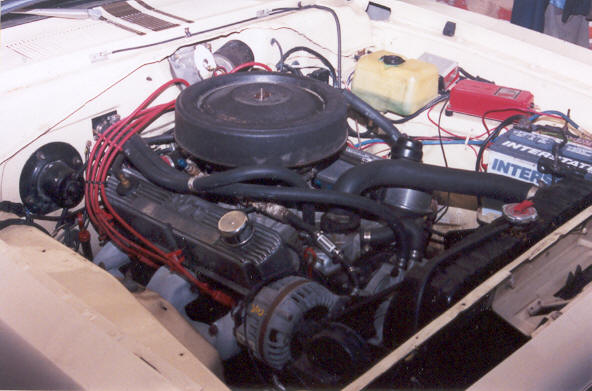
| Engine bay in 1991. Holley
Street Dominator/Contender
single plane intake
provided good
hood clearance. Chrysler Mopar performance ignition,
Remote oil
system and Mecca waterless
coolant system still in place. |
September 2001: MSD 6T replaces the Chrome box, original style air cleaner housing, and horns back in original location. |
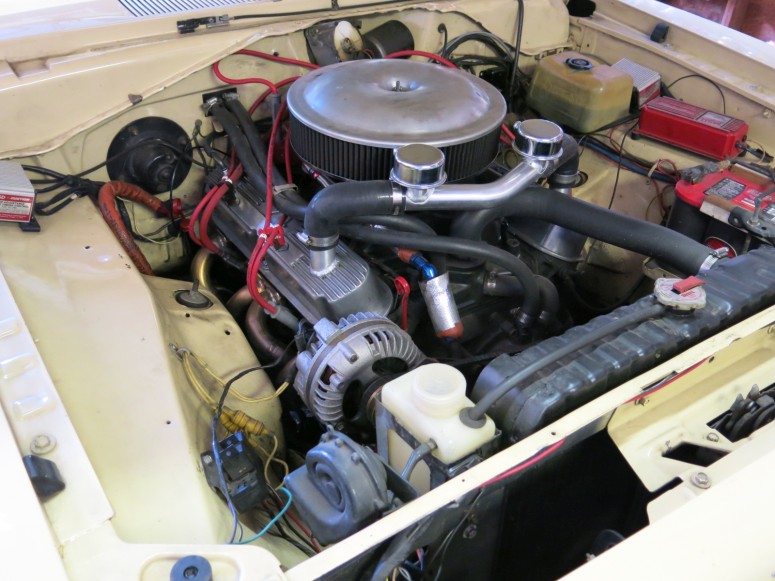
2016. New engine with
LD340 intake, drop base aircleaner with contoured lid,
coolant overflow recovery, breather cross-over and
headers. |
Intakes: I've experimented with both a Holley 650 and 750
vacuum secondary on a Holley single plane Street Dominator, and an
Edelbrock LD340. After studying the runners on the LD340
versus the newer RPM, it appears the RPM probably does a better
job at maintaining velocity in the lower rpm ranges. I'll be
trying one next.
Carburation. One issue with autocross is that the
carburetors seem to have a penchant for flooding out during severe
braking. A cure is to use jet extensions along with a
notched float. Tuning carburetors for performance often
requires more than simply changing main jets. Urich and
Fisher's Holley Carburetors and Manifolds provides a
solid explanation of how the circuits work. Chrysler's MTSC
series has several pamphlets covering Carburetor fundementals as
well as specifics for both Holley and Carters.
I've recieved very good help from reading Jmarkaudio, 'Tuner',
'Shrinker' on several forums. Currently Racing Fuel
Systems forum is the place to go. Ignition timing is
also real important to tuning and that is discussed there as
well.
Exhaust: Until 2015 the 340 Exhaust Manifolds were the
best option for my Barracuda as ground clearance is very
important. I had been through several rounds of headers that
did not fit this car or had poor ground clearance. However I
do believe that headers can be one of the surest ways to improve
power and efficiency. Tests by a magazine show that
even a less than ideal header could make more power than even the
340 manifolds except right around 5400 rpm, where the 340 manifold
does quite well. Additionally a 1968 Hot Rod dyno test of 340
engine modifications suggests the same thing.
Exhaust that is exiting too slow can get drawn back into
the exhaust port during overlap, especially with performance
cams. This is an issue with velocity as much as it is mass
and volume. Racers also are interested in wave reflection at
junctions and other discontinuities. These reflections can
assist or resist the flow in various rpm ranges. Some very
good guidance is available from Larry Meaux's Pipemax
software. In addition, Calvin Elston has been very
generous in sharing his approach, experiences and questions
in his blog
and on Speedtalk forum.
My experience has been that even with manifolds, too large
and poorly positioned X pipe is no help and may be a
hinderence. Only Accurate Exhaust offer tailpipes
specifically to clear the '67 gas tank strap. They also
stock a very nice gasket for headpipes to 340 manifolds. On
my car, their reproduction pipes hung a bit low. Don't know
if it is typical or just this car. We flow tested the
2.25" mufflers Accurate supplied vs. the 2.5" Dynomax Super
Turbos. The Accurate muffler was very good for a 2.25" muffler,
but the 2.5" Superturbos clearly out flow them. Resonance with the
Accurate muffler is much less than with the SuperTurbos.
However I suspect the combo of large exhaust, x in the wrong place
and more restrictive mufflers was hurting performance.
Unfortunately some other changes (such as distributor) means I
don't have back to back testing to verify this.
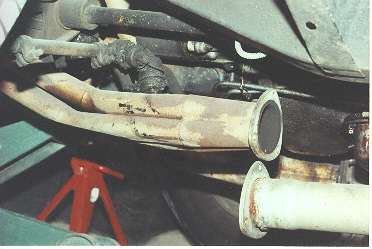
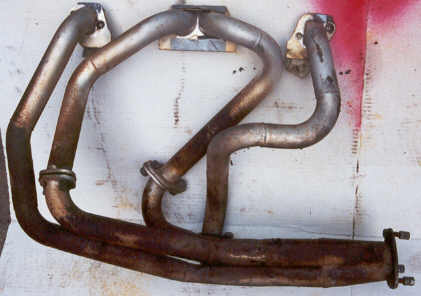
Headers that fit: More options are now availablefor
A-bodies than there have been in years. Headers by Ed has (had) an
easy to install, equal length design with an clever joining of the
tubes into the collector that reduces turbulance. However
they hung too low for the roads of NJ and
Pennsylvania. Doug and TTI both offer headers for
A-bodies with LA engines that reportedly fit fairly well.
Schumacher offers a tri-y, and Layson's has an incarnation of the
'spitfire' short header. However I was determined to go with
custom headers that would fit the car, have low angle merges,
reduce reversion at low rpm and have good ground clearance.
We used a custom made flange for a smooth transition from the
heads to a 1.5" diameter primary that stepped up to 1 5/8.
Details of this build are in this
post on the Speedtalk forum Using stainless steel
reduced the need to experiment with thermal barrier coatings.
Headers by Ed
 .
. 
Results of Contact with Pavement! Headers
& Remote Oil Filter
 .
. 
Even where there was no physical damage the
Jet-Hot coating did not hold up as well as expected.
Its possible temperatures exceeded the 1300 degree limit.
All those gaskets and flange connections
actually sealed pretty well and the bolts were
accessible. Ed did a good job with
flanges ground flat for leakfree
sealing and bolts properly tensioned.
.
Waterless coolant:
The Mecca coolant was rather
expensive and was not all that practical on the street. I
will admit the engine never pinged with the stuff (at least that I
can recall). I lost all of it a couple of times, like when
the cluthch fan went into the radiator. I stopped using it
about the time I went from a 6 cylinder radiator to a larger, high
flow unit. Not sure if the stuff contributed to the recent
failure of a majority of the steel expansion plugs or not. The
theory behind the Mecca system is that better cooling and less
corrosion is possible with a properly formulated propelyne glycol
than a water- glycol mix. The system runs at atmospheric
pressure because the heat transfer is very efficient, using
nucleate boiling to cary heat away from the cylinder walls, but it
never turns to steam (no water in it). The system runs at
atmosphereic pressure. (The reason for a pressurized
system is to increase the boiling point and prevent the coolant
from vaporizing, eg. turning to steam. Steam or vapor does
not circulate very well although it does absorb a tremendous about
of heat when it initally turns from liquid to vapor).
Current cooling system is simply a standard high flow radiator and good old green stuff with distilled water. Unlike the oil temperature. There has never been a problem with the cooling. (Except the fans self destructing - a Chysler flex fan I picked at a junk yard to replace the cluthc unit subsequently sent half a blade through the battery outside of Fredricksburg Virginia) I now am using a new, Mopar Performance clutch fan, and no shroud.
Remote Oil Lines, & Accusump:
 The accusump was great. It was located behind
the rear seat and connected with a braided -10 line under the
carpet. Unfortunately, the lines coming out of the engine
were a recurring problem. The small block mopar oil adapters are a
poor design in every respect. They are not great for flow,
like to leak, and tend to rotate when the external lines are being
attached to them. The recomended way around the adapter is
to tapp right into the block. This could not be done with
the engine in the car, I tried! Additionally, the rubber
inside the Aeroquip hoses would start to get real brittle from the
heat, and after about 12-18 months they would begin to seep
oil. Therefore both the accusump and the remote filter were
eventually removed.
The accusump was great. It was located behind
the rear seat and connected with a braided -10 line under the
carpet. Unfortunately, the lines coming out of the engine
were a recurring problem. The small block mopar oil adapters are a
poor design in every respect. They are not great for flow,
like to leak, and tend to rotate when the external lines are being
attached to them. The recomended way around the adapter is
to tapp right into the block. This could not be done with
the engine in the car, I tried! Additionally, the rubber
inside the Aeroquip hoses would start to get real brittle from the
heat, and after about 12-18 months they would begin to seep
oil. Therefore both the accusump and the remote filter were
eventually removed.
ELECTRICAL
Ignition: MSD 6T with rev limiter, adjustable timing control,
blaster 2 coil, Taylor Wires, Champion RN9YC .045 gap
Three voltage regulators and one chrome
box later, it is my opinion that the Mopar Performance electronic
ignition items leave something to be desired. I keep one
orange box as a back-up, and run the MSD 6T instead. Since
switching to the 6T, the electronic voltage regulator has not
failed. Talking with others, if it does fail, the original
points style regulator will work fine in this application.
The MP mechanical only distributor was great, but gas milage
suffered. I rigged an advance mechanism that switched the
MSD timing retard box on and off . That worked OK, but found
it simpler to simply use a MP distributor with vacuum
advance. My thinking is that it probably improved part
throttle response as well.
The Taylor wires got overheated sitting in traffic for an hour
with air temperature of 95F. What happened was the insulation at
the crimp failed when one of the wires was removed. These were
replaced ASAP with a better protected wire..but it wasn't really a
better wire. I'ld go back to the Taylor's or try the MSD which are
reputed to have a slightly higher heat resistance than the
Taylor's. I've made a comparison chart of
wire resistivity and more comments.
Charging & Lighting:
After suffering many years with a
headlight system on the brink of failure, a major upgrade has been
completed. The addition of an "60 amp" Tuff-stuff alternator from
Hurst Auto & Truck has mostly solved the low rpm charging
problems. A March underdrive pulley on the crank
stopped the tendency of throwing the fan/alternator belt at high
rpm shifts. But alternator output at idle was too low. A bunch of
calculations later showed that the underdrive pulleys could not be
the main culprit - alternator speed at idle was over stock speed
because of the high idle is now around 1000 rom (stock is
500rpm). I've been using H4s headlights, which draw the same
current power as stock, but light the road far better than even
halogen sealed beams. The Hella Vision plus is a good headlamp,
and passes inspection in NJ. Recently, I installed Cibie
E-code lamps in my Grand Wagoneer, and I must say that the Cibies
provide a more even light, and less annoying cutoff than the Hella
Vision plus, or the regular Hella H4. In fairness, the lenses on
the Hella's are now chipped up, mostly from truck stones driving
down south a few years ago. Time to replace I'm afraid.
Page with Details and
Links on Improving the Forward Lighting
SITE INDEX:
Intro:'67 Barracuda..one curve to another
The Story of the Restoration
Grand Wagoneer Page
Pictures from Autocrosses 1989-92 in NJ,
Other cars including my old '74 Nova 250 cid 6 that I
ran in H Stock.
More Tech:
Fuel Delivery Facts and Figures
Ignition Wire Comparison
Improving Forward Lighting &
Electricals
Handling Theory for late-'60s to mid-'70s
Mopars
Strut-rods and Bushings
Disclaimer:
If you take advice, or copy something I have
done, you are on your own. I'm just trying to be helpful.
You need to make your own decisions, and know about or discover
the risks before barging ahead on any endevour.
Claimer:
If you steal something I have written, or a
picture I have taken or drawn, you are a thief. Plain and
simple. If you wish to quote something, you are free to do
so. All I ask for is proper credit. If you wish to
quote or copy more than a couple of lines, then you must get my
permission.
e-mail: M. Grubel
mgcudat rev11 2016